Solution:
Hello Friends,
I had a Rubber Stamp
and unfortunately I lost it. And, suddenly I wanted it for doing some
documentation. Then I tried to find some online tools, but it could not help
me. Then I moved to Microsoft Word to use my creative Ideas. I am very happy
that I always use my mind to do something new and as we know that in MS Word
the formatting toolbar helps a lot. In this tutorial you would know that how
you can create the round shaped stamp. And, of course once you create it then
you can draw any shape stamps as you want.
Step 1: Adding required Text

- Click Insert tab
- Click Text Box and click Simple Text Box option.
- Add required text in the box. For e.g.

Step 2: Formatting the Shape
- Remove Text box Border by using Format tab.
- Double-click on the Text Box. It will look like.
- Click Format tab. Click Text Outline and click No Outline option
- Click Format tab click Text Effects drop-down.
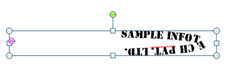
- Point to Transform and click Circle option.
- Drag Red Accent colored pointer to make it as circle.
- Drag the Text box as square.
- Apply Bluish color for fonts.
- Take a screen shot of the text and use its image as a Stamp
If you want to add circle around the text then
add Donut shape and arrange it which would suit with the text.

